|
Late one night during my usual Facebook stroll I entered a Krylon's Mystery Box Challenge on the Krylon Brand Facebook page. Then completely forgot about it. Then one day I receive an email saying I was one of the 50 winners that would receive a free Krylon Mystery Box! I actually won something! The catch was that I was challenged to create something out of the items they provided and then blog about it on or before the 12th of December. So here it is! Here are the items that came in my Krylon Mystery Box. (sorry for the horrible picture )  2 polyester cloths 1 long burlap ribbon 1White gloss Krylon Short Cuts Spray Paint 1 Chrome Krylon Short Cuts Spray Paint 1 Wooden Crate (I did not use all these items) Everyone received different color spray paints in their box so I was very happy when I received white and chrome because those colors work perfectly with my decor! After lots of pondering and trial and error I ended up settling on this...  I decided to create a crate for guest and keep it simple. In the above picture I decided to use it for wash cloths but can easily switch them out and put items guest can use like lotions, razors, shampoo & conditioner, and so on. I was in a hurry so I did not take pictures of the process! So here is a lengthy explanation of what I did... 1. First I sanded the crate with 220 grit sandpaper to make it nice and smooth. 2. I then spray painted the whole crate with the White Gloss Krylon Short Cuts Spray Paint. I did about 4 coats letting it dry between coats. 3. While I let that dry I picked out the button I wanted and the size of cloth and burlap ribbon I needed then used the Chrome Krylon Short Cuts Spray Paint to paint the button, burlap, and lightly paint the cloth. 4. I then used my fingers to fray the edges of the burlap and cloth. I also used extra burlap for the button holes. 5. Once the crate was dry I then used a glue gun to apply the button to the crate. 6. Then I glued the cloth to the burlap and wrote "Guest" in black permanent marker. 7.I then cut part of the left over burlap to make a string and glued that onto the back of the "Guest" sign. 8. Once dry I added double sided tape to the back of the sign and hung it on the button at an angle and applied pressure so the tape would hold it in place. I decided to use tape instead of glue in case one day I want to switch the sign to something else. If you want a more permanent solution just used a glue gun to keep the sign at an angle. 9. Lastly I decided to add wrapping paper to the inside of the crate! I cut the size I needed then applied it to the inside with double sided tape. Again if you want a more permanent solution, use glue and seal it with a spray clear coat. I just like to change things a lot.  I LOVE this wrapping paper! This picture does not do it justice. It reminds me of a birch tree. It is metallic silver with a plain white back ground. I purchased it at Target Christmas 2014. The majority of my house's color scheme is grey/silver, aqua, and black so this went perfect! I really enjoyed the challenge of creating a craft out of these materials..and with a deadline I could not procrastinate on this one! The Krylon Short Cuts were fun to work with but are kinda pricey for being so little... If I had to spend my own money on a project like this I would just purchase a regular size can of spray paint and use the left overs for other projects. But the Short Cuts were the perfect size for such a small project! Thank you Krylon for this fun experience! Thank you for stopping by! If you have time check out my other post! Or leave a comment!
0 Comments
 My parents happened to come across these for FREE during the time I was looking for owl salt and pepper shakers! (my prayers were answered) They were not the solid white ones I wanted but hey, when you don't like the colors, paint! So that is what I did. I decided on white.  So due to being a poor married college student I had to use what paint I had on hand already and all I had was some spray paint primer. Which worked out just fine, it just gave it more of a matte finish. One day perhaps I'll go over them with the more enamel looking spray paint for a more glossy finish, but for now this will have to do :)  Here is what they looked like before I added the eyes. And again they did turn out white though they may look a little yellow in the next picture... but I'm only working with my phone camera and well, you know how that can go....  Here they are finished. I decided to color the Pepper shakers eyes grey so people can tell what one is what. :) How much did this cost me? $0 Since I already had the items.... But I probably used about 1 can of spray paint all together and then I used my valspar antiquing glaze in grey I had left over from my other projects for the eyes. *UPDATE* I was finally able to go over them with a glossy white finish! I just used a white gloss spray paint from Walmart. Since I repainted them I had to redo the eyes. This time I used the Martha Stewart Metallic Glaze in Black Coffee, let that dry then did a layer of Martha Stewart Metallic Glaze in Mercury to help soften the eyes a little. Below is the "new" after picture. I definitely like the glossy look and the metallic eyes!  Like The Aqua Owl Blog Facebook page HERE!
 This redo was inspired by multiple bloggers I found on pinterest. Most of them seemed to use chalk paint but I am not a fan of chalk paint. My husband LOVES pepper, I think way too much. So pepper mills and shakers are a must at the table. So when I found these wooden ones at the D.I. (thrift store) for only 75 cents a piece I had to have them! They were perfect! Though all they had were pepper ones that was perfect because we do not add salt to anything, so we have no need for salt, unless we have guest I suppose. Below is the before picture.  They were in great condition, not a flaw on them. I really liked the dark wooden one, but of course I REALLY wanted to paint them to go better with my decor. Here is what I did. First thing I did was sand them a little so that the primer would adhere better, even though with the primer I use you do not have to, but I like to be on the safe side. Here is the primer I used.  I did enough coats to where I couldn't see the wood through the paint, which took a few coats and I had to sand a few spots in between layers to make it as smooth as I wanted. After I let the primer dry I then painted one with the ice grey paint color I had left over from another project that I got from a local paint store. It is VERY close to white. I had to do a few coats with this color. I did not enjoy having to hand paint this, a spray can is so much easier for small projects! But, I needed to use my left over paint. On the other I used Krylon Blue Ocean Breeze spray paint that I got at Walmart. I did a few coats of this as well, until I got the color I wanted.  After the paint dried I then glazed it with my valspar antiquing glaze and let that dry. Since I am not using a top coat (so it won't have any yellowing) I am letting this dry for a month before use just to be on the safe side.  All done!   First of all, I love when I find free stuff that people just throw away! My dad from time to time helps clean out houses and he sometimes forgets to look in every box before he throws it in a garbage pile, so every so often I go through that garbage and that is how I came across my owl salt and pepper shakers and now these other owls! For the longest time I have had my eye on some bookends and the owl ones always popped out to me. A little side note, I'm pretty sure my husband and I only have about 10 books (sad I know). They have a hard time standing up on their own and the owl bookends have always popped out to me when I've looked online, though I never could justify paying for them. So, as fate would have it, my patience paid off, and I found these!  I liked how much detail they had, unfortunately, they did not match my decor. So I cleaned them off since they have been outside in a box for who knows how long, repaired part of the holly leaf that broke off with super glue, and got my primer and paint ready. Below are the products I used.
I did enough coats with the primer to where I could not see any of the colored paint anymore. I let that dry and then touched up some of the rough parts then used the white gloss spray paint until I got the glossy finish I wanted. This whole project only took me a day to do!
*Since these owls are fine china and therefore pretty light, I may go back and fill them with some sand to make them heavier and seal the holes, but for now they seem to hold the weight just fine!  Ocean/Beach/Aqua Theme Vanity Redo  My Grandma from South Carolina was staying with my family for over a year and so we decided to redo the guest room for her with a beach like feel! I was in charge of redoing this very old vanity!  It has drawers....and hardware....I just got so excited I went right to taking it apart and on to sanding before I remembered I needed a before picture and I was too lazy to put it all back together...sorry :( Also for a heads up sorry for the lack of pictures, but I will try my best to explain how I did it! The pictures may not be the best due to very poor lighting. PREP First I took the drawers out, mirror off, and hardware off and began sanding with an electric sander. This vanity was painted an antique white and for some reason was very bumpy so I had to sand A LOT to get to the smoothness I wanted. Then used a wet clean white rag and cleaned off the dust, then let it dry. Next I cleaned off the hardware to get them ready to be painted. Now, paint time.... I used a metallic spray paint to cover the gold hardware. Continued to layer the paint until I got the coverage I wanted. Once that was dry I then went over it with my Valspar antiquing glaze in grey that I had left over from the kitchen table redo. Once I got the look I wanted and let it dry, I then used a water base sealant since handles get a lot of use. Below is the after and the glaze I used.
I have yet to get a paint sprayer, which would have made all of this easier...and faster.....so I used brushes. I used two different colors. For the base I used the highest gloss of Aquamarine and for the darker highlights I used a pearl Bahamian blue left over from my kitchen table redo. I did not use a sealant. After my table redo, I was told never to do that because no matter what kind you use it will always, one day, turn colors. So we will see how this holds up because my kitchen table turned colors even though I let it dry and used a water base sealer. So I started with a Primer and did 2 coats, sanding between to get a perfect smooth surface. Then I did 3 coats of the Aquamarine, sanding between coats, not sanding the last layer. Next I added some Floetrol (picture below) to the Bahamian blue. This helps the paint not dry so fast and helps prevent brush strokes showing. You can also use this in the base paint if you would like. Since I was applying the Bahamian blue like you would a glaze, I needed a way for it to not dry so fast, and that is what I came up with, and it worked perfectly!
After that all dried I then decided to add the Valspar Glaze to the detail work on the vanity. I used a very tiny paint brush for this. I did a couple layers until it was dark enough for me. Once all was dry I put the drawers back in and added the hardware and BAM! What a beauty. I will have to post pictures of the whole room at some point. We were able to find a bed headboard that matches PERFECT with this hardware, and it was super cheap! Bonus!  I decided not to add the mirror back on, due to it being old and needing replaced. So, once I get the mirror thing figured out, I'll post an updated picture!  To add some beach-ness to it, I added vases and added sand from different beaches we have been too to hold the candles. Well, there is it! I just love how it turned out! It works perfect in this grey walled, beach themed room! Hopefully I can get some better pictures of it one day, these just don't do it justice! 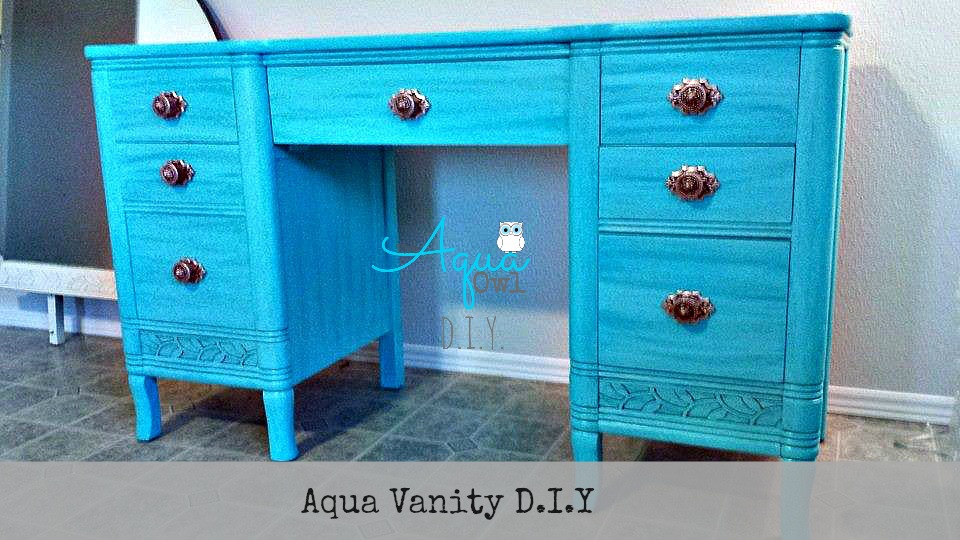 |
Archives
February 2015
Categories
All

|


 RSS Feed
